Search This Blog

Tuesday 20 September 2011

Effect Mapping to manage products

Just been to this talk by Gojko on Product Management using Effect Mapping. It is a technique which is useful for high level project visualisation. It is very similar to mind mapping technique where stakeholders, users and teams colloborate on project scope.

It helps reduce scope of wish lists and helps teams focus on business goals by asking the questions Why?, Who?, How? and What? in this orders

Why? Allows you to narrow down to the business goal. This is the centre piece of your effect map from where all other discussions should start and reason upon

Who? It is not the user but it is who can cause the desired effect to achieve the business goal. In most cases these are project/ product stakeholders.

How? For each stakeholder , identify how the target group can achieve or obstruct the desired effect in real life and not in terms of software, these should effectively be stakeholder needs

What? For each stakeholder identify what business activities or software capabilities would support the needs of the stakeholder. These become your epics in the product backlog

At the end of the effect map both the stakeholders and team should be able to see the synergy of the business goals and what needs to be achieved.

For more see, Gojko’s white paper on this see http://gojko.net/effect-map

Some advice from people who have used this are..

  • Getting the right number of people can be a challenge
  • Staying focussed and at the right level of detail is important
  • Ensuring enough focus on the how is important
  • Keeping everyone away from solutionising is a real big challenge when technical people are involved
  • Ideal group size of 5-8 when working for a time box of 2-3 hours
  • Will be of immense value to the business

This technique is not necessarily something for agile projects you could use it even for waterfall projects

A useful tool I have found which you can use for this is at www.mindmeister.com. Check it out its pretty handy. Even if you are a developer striving to do something on your own , if you put your ideas on a mind map it will help you visualize the idea. Smile

Friday 16 September 2011

Running SOAP UI Tests in Teamcity using MSBuild

One of the web services we have has a bunch of SOAP UI Tests. I wanted to make sure when this was run on the build server we have good feedback for each test case rather than a whole build running a pack of tests and telling you if it failed or passed. Kind of a reason i was moving this build away to Teamcity from cruise control

The MSBuild script is as below. I had to define the variables I need and the Directory where all project files for Soap UI can be found.

   1: <Import Project="$(MSBuildExtensionsPath)\MSBuildCommunityTasks\MSBuild.Community.Tasks.Targets" />
   2: <PropertyGroup>
   3:     <SoapUIDir>$(MSBuildProjectDirectory)\SoapUI</SoapUIDir>
   4:     <SoapTestTool>C:\Program Files\eviware\soapUI-4.0.0\bin\testrunner.bat</SoapTestTool>
   5: </PropertyGroup>

The next thing I had to do was run each project file using the SOAP Ui testrunner.bat file.

The options I have used –j will ensure JUnit style reports are pushed out of the Soap UI test runner, for local builds you could just make it push out Html reports

-h allows you to specify the host header to use for your Urls, The host header you supply here will override what is stored in the SOAP UI projects , so you run these tests on different sites based on your environment.

I have done a FileUpdate because i wanted to change Urls of the service from the old server to the ones on the new servers, you wont need this and it can be ignored

   1:  
   2: <Target Name="ConfigureSoapUITests">
   3:    <MakeDir Directories="$(SoapUIDir)\Report"/>    
   4:    <ItemGroup>
   5:      <SoapUIProjectFiles Include="$(SoapUIDir)\*-soapui-project.xml"/>      
   6:    </ItemGroup>
   7:    <!-- Replace old server urls with new ones -->
   8:    <FileUpdate Files="@(SoapUIProjectFiles)" Regex="$(someurl)" ReplacementText="$(newurl)" IgnoreCase="true"/>
   9: </Target>
  10:  
  11: <Target Name="RunFunctionalSoapUITests" DependsOnTargets="ConfigureSoapUITests">
  12:    <!--Run all the soap ui functional tests-->
  13:    <Exec Command="&quot;$(SoapTestTool)&quot; &quot;%(SoapUIProjectFiles.Identity)&quot; -h &quot;$(HostHeader)&quot; -I -r -a -j -f &quot;$(SoapUIDir)\Report&quot;" />
  14: </Target>

At this point I hooked up the MSBuild target to run on Teamcity using the MSBuild runner, for the target “RunFunctionalSoapUITests”. The feedback wasn't good

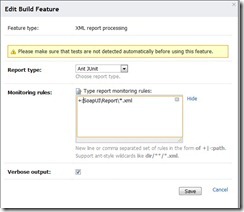
The final bit you need to do is configure Teamcity to read the xml styled junit reports that the test runner is spitting out. You can do this using the Build feature option for XmlReport processing as shown in the screen shot.

Now trigger the build if you have sorted out all the other variables required you can run the build and see the output on Teamcity, pretty good really on test case by test case basis.

buildfeature

For failed tests I added a configuration for artifacts as follows, Teamcity will show you the response but to see the entire request response file , you need to setup artifacts as follows. All failed test cases create a .txt file which ends with FAILED.txt, so I push these as artifacts and i can see this for failed tests,

SoapUI/Report/*FAILED.txt => FailedTests

I find this useful that with little effort so much could be done and feedback is really good

Tuesday 6 September 2011

User Story - A Promise to have a conversation

 
Time and again it is important to constantly remind your team that a User story is not just a way of defining a requirement but is actually the premise on which you promise to have conversations with the user. It is by no means a finalised description of what the system should be doing. The first time it is written the analyst or product owner only has as much information as the user gives them. This information is pretty much raw most often a wish list off some post-it notes on the edge of the users monitor. It will have information of what the user wants to achieve or the grand plan of how something could be done brilliantly to save money or achieve a business goal. It will not tell you what the user wants the system to do.
This is where collaboration is fundamental to the idea of agile development ( should i say ADD – Agile Driven Development). The user story is to be evolved by having conversations between various functional experts. By functional experts I mean a QA, a developer, a business analyst or even a UI designer for that matter. The question is why? I guess it’s because these functional experts can think of the software that is to be built with a view of what the system should do, A user story should convey both what the user wants to do and what the system will do to be complete, clearly the initial draft of these stories didn’t do this.

When a developer evolves a story on his own he is going to make sure it is technically brilliant (may be not always) and eventually forget what the user wants , in most cases this conversation ends up in the developer trying to define what the system should do and what the user wants..  how many over engineered systems have we not seen and been part of in the past

When a UI designer is going to evolve it on his own he is going to make sure it is pretty software and most likely to make it usable but with lack of clarity of the functionality that the user really needs, he just has his wireframes or prototypes, which shows the user the dream he wants to have

When a QA is going to evolve this on his own he is going to make sure it is very testable, infact so testable that they start defining behaviour of the application and the implementation of the software even though they may or may not match what the user wants.. oh well make it testable but so testable that the stuff you build is not usable.

The analyst on the other hand is so caught up with making sure he conveys what the user wants he forgets most often how to test the functionality or in some case forgets to tell the team what the system should do  , well don’t blame him they are not the functional experts on the technical implementation of a system

We have seen these things happening all the time, any form of methodology without collaboration kind of summarises the situation in which these things happen. Alright then, so we can’t do without collaboration so what now and how far do we go with collaboration? How do we know where to stop, well I am going to have to be vague and say well it’s for the team to figure it out in the context of the system they are working but then, I guess some of the answer lies in the ability of the team and the user to work towards coming up with stories which adhere to INSPECT and the story itself becoming the documentation of the system.

As Gojko says in his book “Specification by Example” stories evolve into living documentation of the system. When you can actually read a story and express in simple English, the aspect of what the user wants to do and what the system is doing to achieve the users need, you could say you have reached that point where you can stop and move on to the next bit of functionality.

Again living documentation is not written once; it evolves over a period of time by refactoring constantly; Teams that collaborate constantly recognise this need to bring the stories used to build the system in line with the domain concepts in the system, and vice versa, it is a constant cycle of refactor and improve.. Oh should I say iterate and continuously improve... Rings a bell... Agile?. In reality, collaboration is under-rated by teams and it is something teams think they should do because it needs to be done. Most agile teams do this once for every story (I am laughing already) while estimating the story not so much while actually implementing it. That said there are also teams which constantly collaborate. I guess question is which team are you working in and what are you going to do about it ?


Monday 27 June 2011

Screw Unit – Teamcity Integration

I had to setup up client side tests to run for my team on Teamcity. I initially thought I should use rake to do this, but then I had to leverage the fact that my team is comfortable with the .Net stack and not so much with Ruby. At this point I just thought i should use a unit test to run my screw unit test via Watin in a browser. This idea is available in a lot of other blogs for QUnit tests. The unit test opens the suite.html , parses the file and reports if the test failed or passed.This works fine. But then when a test failed I had to either look at the logs of the build or had to navigate to the Url, this feedback was ok but not great

I tried to write a teamcity test runner for screw unit which will send messages to TeamCity , but this was hard work and the effort involved was simply too much

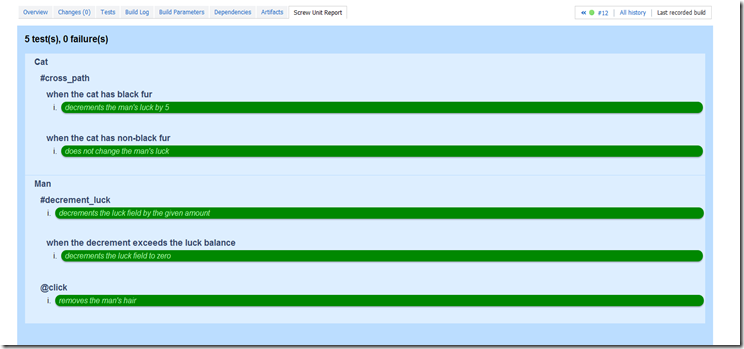
If not real time feedback from a test runner, at least seeing the suite.html as a tab on my build would be good.. so I just pushed the artifacts for the build to include the Screw Unit test pack and set up a new tab in TeamCity server config file (main.config file) called Screw Unit Report. This tab would open the html file for the tests from the artifacts. So now I have TeamCity showing the Screw Unit suite as a tab, that's better, the only thing is when you click on the tab it runs the tests every time, but that's not such a big deal really Smile. The effort involved in setting this up was 30 minutes. (I already knew how to setup tabs in TeamCity )

So to summarize

1. Write a unit test runner which will use Watin to open the Screw Unit test suite.html file.

   1: using System;
   2: using System.Collections.Generic;
   3: using System.Diagnostics;
   4: using System.IO;
   5: using System.Linq;
   6: using System.Threading;
   7: using MbUnit.Framework;
   8: using NHamcrest.Core;
   9: using WatiN.Core;
  10:  
  11: namespace Tests
  12: {
  13:     [TestFixture]
  14:     [Timeout(600)]
  15:     public class TestRunner
  16:     {
  17:         private FireFox browser;
  18:  
  19:         [SetUp]
  20:         public void SetupBrowser()
  21:         {
  22:             browser = new FireFox();
  23:         }
  24:         /// <summary>
  25:         /// Tests that ScrewUnit tests pass
  26:         /// </summary>
  27:         [Test]
  28:         [Category("ScrewUnitTests")]
  29:         public void RunAllTestsFromSuite()
  30:         {
  31:             var screwUnitTestFile = Path.Combine(Environment.CurrentDirectory, @"Javascript\ScrewUnit\tests\spec\suite.html");
  32:             browser.GoTo(@"file:///" + screwUnitTestFile);
  33:             browser.WaitForComplete(5000);
  34:  
  35:             var resultsDiv = browser.ElementWithTag("h3", Find.ByClass("status"));
  36:             resultsDiv.WaitUntil(() => resultsDiv.Exists && !resultsDiv.Text.ToLower().Contains("Running"), 30000);
  37:  
  38:             AssertThatTestsHavePassed(resultsDiv);
  39:         }
  40:  
  41:         private static void AssertThatTestsHavePassed(Element resultsDiv)
  42:         {
  43:             var resultsArray = resultsDiv.Text.Split(new[] { ' ' });
  44:  
  45:             var numberOfFailures = Int32.Parse(resultsArray.ElementAt(2));
  46:  
  47:             Assert.That(numberOfFailures, Is.EqualTo(0), string.Format("{0}. Click on the Screw Unit Report Tab to see the details", resultsDiv.Text));
  48:         }
  49:  
  50:         [TearDown]
  51:         public void TearDownTestRunner()
  52:         {
  53:             browser.Dispose();
  54:             Thread.Sleep(2000);
  55:             var browserProcesses = Process.GetProcesses()
  56:                     .Where(process => process.ProcessName.ToLower().Contains("firefox") && process.StartInfo.UserName.ToLower().Contains("build"));
  57:                     browserProcesses.Each(p => p.Kill());
  58:         }
  59:        
  60:  
  61:     }
  62:     public static class Extensions
  63:     {
  64:         public static void Each<T>(this IEnumerable<T> collection, Action<T> action)
  65:         {
  66:             foreach (var item in collection)
  67:             {
  68:                 action(item);
  69:             }
  70:         }
  71:       
  72:         public static void WaitUntil(this Element element, Func<bool> predicate, int timeout)
  73:         {
  74:             var startTime = DateTime.Now;
  75:  
  76:             while (!predicate())
  77:             {
  78:                 Thread.Sleep(1000);
  79:                 var now = DateTime.Now;
  80:  
  81:                 if ((now - startTime).TotalMilliseconds > timeout) throw new TimeoutException("Timed out waiting for condition to become true");
  82:             }
  83:         }
  84:     }
  85: }

2. Push the Screw Unit test suite into the artifacts of your build in the team city configuration of your build

3. Configure the main.config file located at <TeamCity Install Folder>\.BuildServer\configuration\confg to create a new tab.

Run your build and you should be able to see the screwunit report on the build server now

   1: <server>
   2:  
   3: <report-tab title="Screw Unit Report" basePath="ScrewUnit.zip" startPage="tests/spec/suite.html" />
   4:  
   5: </server>
   6:  

screwunittests-report

You could use the screwunit test sample i took from git hub to test this Screw Unit Tests sample

Thursday 16 June 2011

Step by Step - Cucumber, WatiR and Ruby installation tips

There are few road blocks you hit when you go about the process of installing Cucumber, Watir and Ruby the first time, you have to search all the information and then as you install there are some things that work while some dont , I just thought it may be a good idea to consolidate the information in one place for myself if i do run into this situation of having to install this again. I have tried and tested this thrice and use the same process to install our test agents.

  • Installing Ruby

#Tip – Choosing the version of Ruby installer

Watir is stable with Ruby 1.8.7 so dont carried away and install 1.9.x of ruby , you learn the hard way that it is not going to work properly.

See Http://watir.com/installation for updates on when 1.9.x support will be provided. Go to http://rubyforge.org/frs/download.php/74293/rubyinstaller-1.8.7-p334.exe download the exe and run the installer. I chose the installation folder to be called just ruby as I want to avoid installing multiple versions for now.


  • Ruby Path

Check if "c:\ruby\bin" is included in the path (else run PATH=%PATH%;c:\ruby\bin at the command prompt)

  • Installing the Dev Kit for Ruby

Download http://github.com/downloads/oneclick/rubyinstaller/DevKit-tdm-32-4.5.1-20101214-1400-sfx.exe .

  1. Click on it to extract files to a folder <DEV-KIT-FOLDER>.
  2. Open a command prompt for the <DEV-KIT-FOLDER>.
  3. Run the command “ruby dk.rb init
  4. Run the command “ruby dk.rb install

Not sure if you need this but run a “gem update system” and it should say Nothing to update :).

  • Installing gems

Now at the command prompt

  1. Run “gem install cucumber”.
  2. Run “gem install watir”
  3. Run “gem install “win32console”
  4. Run “gem install rspec”
  • Installing ANSI con – if you are unable to see colours on your console window when you run a cucumber feature, you may need to install ANSICON
  1. Go to http://adoxa.110mb.com/ansicon . Download AnsiCon 140.
  2. Extract the files.
  3. Open a command prompt for the folder you have extracted the files in
    cd to x64 folder if you use a 64 bit machine or x86 folder if you use a 32 bit machine
    type "ansicon.exe -i"
    Close the command prompt , open a new one

This should be sufficient to run cucumber features now. In a weeks time I will post a project framework with some useful stuff for ruby / selenium / cucumber which can be downloaded so you can go about building tests quickly

Wednesday 15 June 2011

ScrewTurn Wiki

I was looking for a some kind of ASP.Net sample site purely to demo some BDD scenarios at work, but then I wanted to do it on a site which is more complex than the usual ASP.Net sample site made of Customer/Order.

I found a couple of Wikis, but the one that caught my eye was ScrewTurn Wiki. First things first it is free under the GPLv2 license (for more details on commercial licenses see Commercial License Help)

The installation took less than a few minutes using the Microsoft Web Platform installer, You install the Wiki in one of two modes file system storage mode or SqlServer storage mode (just use SqlExpress). To choose which mode you want to install. See Installation Help for more details. Apparently you can go with file storage mode and then switch to the SqlServer data storage mode later (Data Migration)

The fact that you can manage the ScrewTurn Wiki using Microsoft WebMatrix is simply brilliant. The ease of use and ability to be able to publish the Wiki is simply useful. You can pretty much configure your hosting details if you wanted to host something on the internet and keep pushing your changes.

Now for Plugins, quite a lot of them seem to be available. There are vast number of navigational, text editing and data provider plugins. In addition to this you can customise different portions of the Wiki using your own providers , this seems like one of those things that was given a great deal of thought. See Custom Providers

I guess I am very impressed by what the Wiki offers, but looking at the features I am actually wondering if a product which was a Wiki is evolving into a CMS? Not sure, cant say I am bothered either, the only reason I raised that concern is the Wiki as is, is pretty simplistic and this is what appealed to me, building too much into could make it bulky and complex. I am just a developer so I cant give an accurate view of what users of the Wiki would want. On the bright side there are some really new features that are coming and that can be leveraged. V4 CTP offers native Azure support which should be good if you wanted to use Cloud based services I guess. See Roadmap for more details

Monday 13 June 2011

DDD eXchange 2011 Podcasts

Attended this conference on Friday (10/06/2011) and was consolidating the links for the podcasts

Some of my favourites are

  • · Greg Young on Assert.That(We.Understand) – related to TDD
  • · Udi Dahan on Domain Models and Composite Applications
  • · Jim Webber on REST and DDD - REST based APIs
  • · Matthew Wall on REST & APIs in the Guardian's DDD Processes

Podcast Links